When a template is moved to Workspace, the template does not relocate within the system; instead, it is “copied” to the Workspace area, and is now considered a “document.” The original template still resides in the Available tab of the Paragraphs page. Under the Workspace tab, a user can also view whether or not a document also exists under the Active tab, and if it does, which revision exists there.
Workspace Document Stages
There are several stages that a document must go through during processing. The “Status” column in the Workspace lists where each document stands in this process:
- Draft: This reflects a document that has been moved to the Workspace, but not yet edited.
- Draft: In Process: This reflects a document that has been edited/reviewed and the changes made have been saved.
- FAA Signed: This reflects that a document has been signed by an FAA Inspector.
- Industry Signed: This reflects that a document has been signed by an industry user.
- FAA & Industry Signed: This reflects that a template has been signed by both an FAA Inspector and an industry user when both were present at the same time in the same location. Unlike other templates with “…Signed” statuses, this designation allows for two signatures and will show two signature blocks on the printed document.
HINT: Documents with status listings of “Draft in Process” or “…Signed” can be redrafted.
Workspace Functionality
Because WebOPSS allows for more versatile data entry, when users are in the process of editing a document they will come across a variety of different functionality. This new functionality usually takes the form of icons or buttons that allow users new options to either add data to the document or gain further information about what action is required:
- Help text icons (
 ) exist to provide extra information to the user to mention what information is required in a specific table column or what action is required by the user for a data entry control (such as text boxes, labels, etc.); the icons always appear directly next to the item they provide help for. Hovering the mouse over the icon displays the message “Click for help,” and clicking on the icon opens a popup window containing the actual help text:
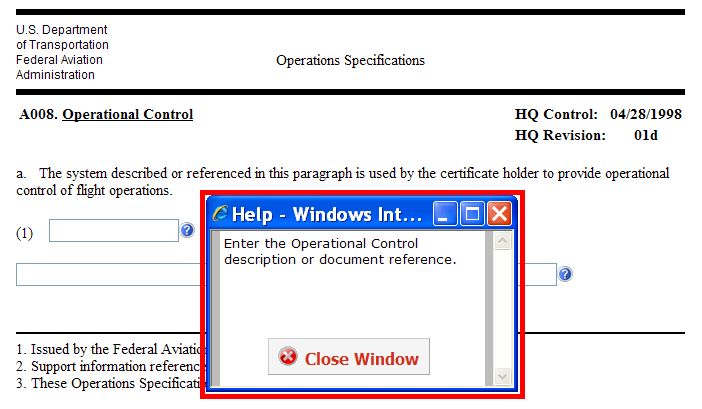
Figure 5.13: Help Text
- Adding table rows is done using the green plus button (
 ) at the bottom of tables. Once users click on the green plus button, a new row is added:

Figure 5.14: Adding Table Rows
- Deleting table rows or changing the sort order is done using the page peeling image. When the user first opens the document to edit, the sort order settings are not visible. By hovering the mouse over the peeling page icon, users can select Delete Row (though the system will always keep at least one row), Sort Ascending/Descending (which sorts the table based on the set sort order), Show/Hide Sort Order (which hides/displays dropdowns in each header column that allow the user to see or modify the column sort order for the table). The system will ensure that two columns do not have the same sort order. When the user changes the sort order, the system will always maintain a sequential sort order by incrementing or decrementing the sort order for the conflicting columns as necessary:
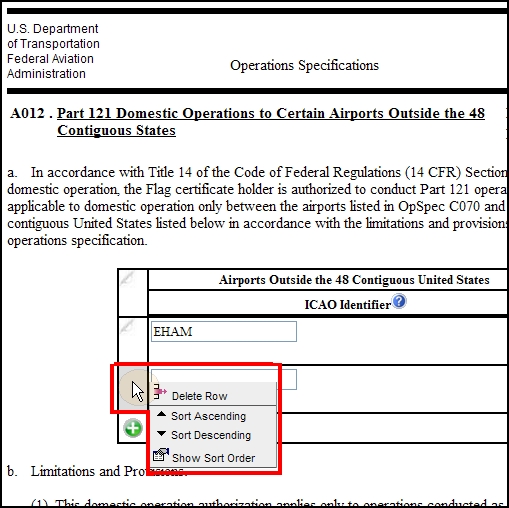
Figure 5.15: Deleting Table Rows and Changing the Sort Order
- Combo boxes are data entry controls that look like simple dropdown menus, but actually provide the functionality of both a text field and a dropdown. Users should use the help text to identify these, since the help text verbiage will mention that users should “Enter…, or select…”; as an example, a help entry might read “Enter approved methods for obtaining and disseminating weather data. If EWINS is authorized, select N/A.” To enter text in a combo box, users simply click in the text area and begin typing; to select an option, users should click the down arrow and select the desired option (often “N/A”):

Figure 5.16: Combo Box Functionality
- Text (AJAX) are data entry controls that look like simple text boxes, but actually provide the functionality of both a regular text field and a text-search function. This is used most often with lists of aircraft/runways. Users should use the help text to identify these, since the help text verbiage will mention that users should “Begin typing the first few letters…, then select…or enter value”; as an example, a help entry might read “Begin typing the first few letters of the Airport (ICAO), then select. If selection is not available, enter value.” To enter text in a Text (AJAX), users simply click in the text area and begin typing; to search for options, users should click in the text area and type the first 3 letters of their desired option, and any matching selections will appear in a dropdown menu:

Figure 5.17: Text (AJAX) Functionality
- Links to Data Forms pages are indicated by the green plus with page icon (
 ) at the bottom of tables. Data Forms pages allow users to access other areas of WebOPSS that contain operator data within the context of the document being edited and without leaving the Authorizing Documents section. Data Forms links only appear at the bottom of tables that pre-fill with operator data; in other words, a link to a Data Forms page will not appear at the bottom of a table in which all the columns must be completed by the user, such as with text fields and dropdowns. Users will only access the Data Forms page in a document if they need to add, edit, or remove the data from a pre-filled table. To do so, users simply click on the Data Forms icon and make the necessary changes on the Data Forms page. Once the new data is entered, users can click Refresh and Close for the new data to be displayed in the document:
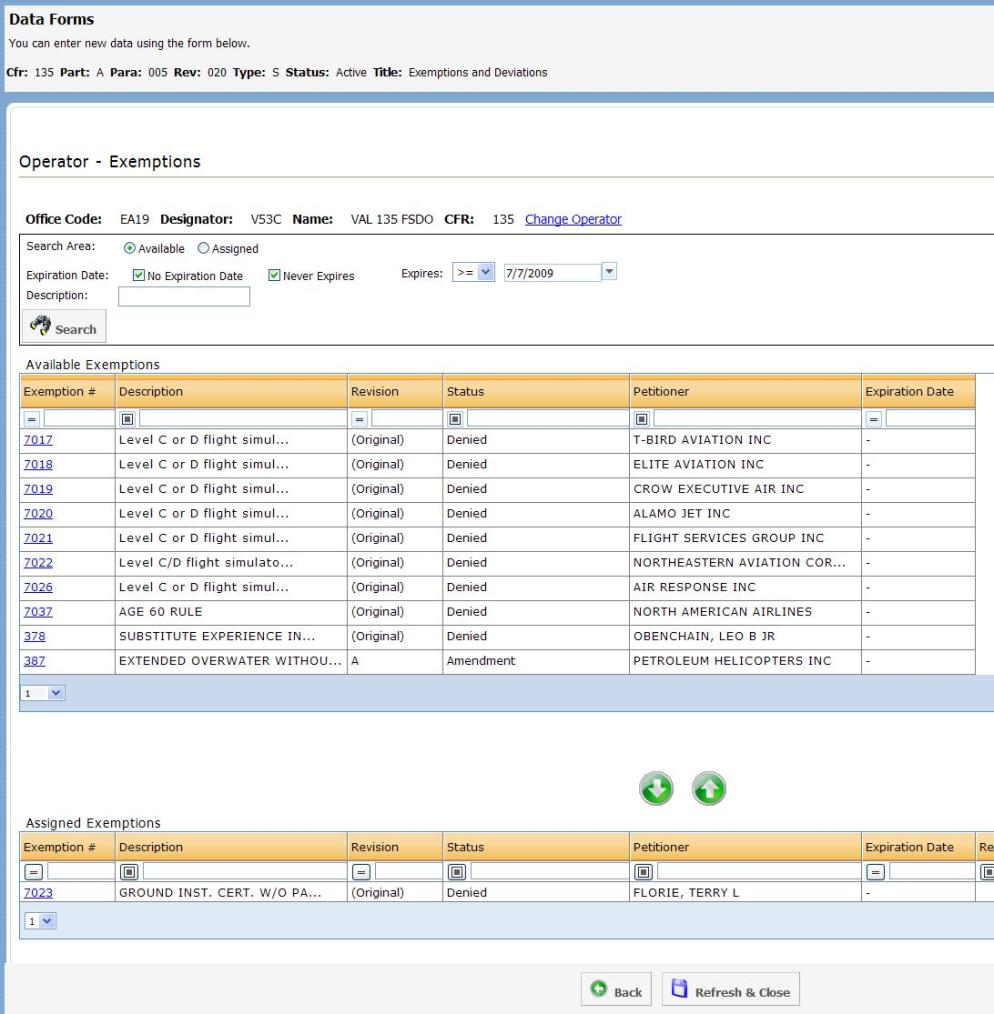
Figure 5.18: Data Forms Page
- Labels are indicated by the pencil icon (
 ). These data entry controls are data that automatically display when there is data entered, but show nothing when there is no data to enter. Most of the help text verbiage for labels will mention that users should “LOAD from database…”; as an example, a help entry might read “Agent for Service - LOAD name and address from database.” To change a label’s data, users click on the pencil icon, and will be taken to a Data Forms page to enter the correct information. Once the new data is entered, users can click Refresh and Close for the new data to be displayed in the document:

Figure 5.19: Label Control
To Edit a Document:
- In the left navigation under CHDO, click Maintain Authorizing Documents. The Authorizing Documents page appears.
- Open the Workspace tab:

Figure 5.20: Authorizing Documents—Workspace Tab
- Select the row of the desired document.
- Click Edit. A separate window opens displaying the document information.
- If desired, click From Active.
NOTE: The From Active button will only appear for documents that already have a version that has been previously Issued. Clicking From Active brings over the data stored in the Issued document to the current open window (for ex., a table with several rows of aircraft information that have dropdown options in each).
- Make the necessary changes to the document.
- Click either Save and Apply or Apply.
HINT: There are two ways to save changes to the document once it has been edited. Clicking Save and Apply will save the information and close the window containing the document information. Clicking Apply will save the information but keep the window open for further changes.
- If Save and Apply is clicked, do the following:
- A pop-up window appears to verify a successful action.
- Click OK.
- If Apply is clicked, do the following:
- Make the necessary edits to the rest of the document.
- Close the window by clicking either Close Window at the bottom of the screen or the red X at the upper right corner of the window (
 ).
).
HINT: There is no need to reselect the recently changed document, since it remains selected after the document information window is closed. Also, the document status is changed from “Draft” to “Draft: In process.” However this will only be visible once the browser is refreshed either by clicking the browser refresh button ( ) or selecting F5.
To Sign a Document:
- In the left navigation under CHDO, click Maintain Authorizing Documents. The Authorizing Documents table appears.
- Open the Workspace tab.
- Select the row of the desired document.
- Click Sign.
NOTE: Depending on the role of the current user, different options may appear on the Sign Executed Document page.
- If the current user is an Inspector, the Sign Executed Document screen appears:

Figure 5.21: Sign Executed Document—Inspector Page
- If the current user is a field user, the Sign Executed Document screen appears:

Figure 5.22: Sign Executed Document—Field User Page
NOTE: A signed authorizing document is referred to as an "executed" authorizing document.
- The page will display Office Code, Designator, Name, and CFR, as well as document Part, Para, Rev, Type, Status, and Title.
- "Signer Type" is automatically filled in with the current user's role. The two most common signer types will be FAA Inspector or industry Certificate Holder.
- If the current user is an Inspector and if desired, check the Move to ‘Issued’ after signing box.
- If desired, change the New Amendment # in the text field.
HINT: Changing the amendment number is a role-based permission. For some users without the appropriate permission, the New Amendment # text field may be grayed out (inaccessible).
- Under the “Origin” section, select either Issued by FAA or Certificate Holder applies for these Operations.
- If desired, enter support information in the Support Information Reference text field.
HINT: Support information can be entered by either party.
- If the user is an Inspector, select the radio button next to Will industry digitally sign? If an Industry user has already signed the document, the Inspector will not see this question. If the user is an Industry user, this question will not appear on the page.
- If desired, select the Acceptor from the dropdown list. If the answer to Will industry digitally sign? in the previous step was No, then selecting an Acceptor becomes required.
HINT: Selecting acceptor name means that the current user is signing on behalf of the selected user.
- If the current user is an Inspector, select the Issuer from the dropdown list.
- If the current user is an Inspector, click in the Effective Date text field to choose a date from the calendar that appears.
- To Upload .pfx or .p12 Digital Certificate File, click the Browse button.
- Find and select the digital certificate file.
NOTE: Users must supply a valid digital certificate. Invalid certificates are considered to be those which have expired since the date of issuance or which have been revoked (e.g. the user issued the certificate has since left the company). If users are unable to successfully sign with a digital certificate, go to Tools > Getting Help in the left navigation bar for Digital Certificate Support.
- Click Open.
- Enter the password for the digital certificate file in the Private Key Password field.
- If desired, select the Preview button. The digital signature as it will appear on the document in displayed in a Preview pane to the right of the Support Information Reference field.
NOTE: If too much Support Information has been entered making the signature no longer fit the space available on the document, yellow highlighting will appear on the text which does not fit. A message will also appear at the top of the screen letting the user know how many characters of Support Information will need to be removed before proceeding.
Make any necessary changes and click Preview button again to refresh the signature.
- Click Sign.
IMPORTANT NOTE - IF YOU HAVE SIGNED DOCUMENTS SITTING IN WORKSPACE AT THE TIME OF THE NEW RELEASE:
Because the format of the digital signature was changed in the current release (April 2012), already-signed documents which are sitting in the Workspace in CHDO: Maintain Authorizing Documents at the time of the new release will have to be edited again and re-signed.
You will know if the document has to be re-signed by looking at its Status in Workspace:

Multi-signing documents: If you select multiple documents at one time and click Sign, you may see a popup warning message because the documents may not all have the same Status. Note the Part/Para numbers of the documents you see in the warning popup message, and follow the chart above for action on each document individually.
Eventually all documents in the Workspace will be signed with the new signature format and there will be no more documents with the old signature format. You will no longer see a warning message on clicking the Sign button.
To Preview a Document:
- In the left navigation under CHDO, click Maintain Authorizing Documents. The Authorizing Documents page appears.
- Open the Workspace tab.
- Select the row of the desired document.
- Click Preview. A separate window opens displaying the document information in PDF format.
- Close the document information window by either clicking the Close Window button at the bottom of the screen or the red X at the upper right corner of the window ().
To Issue a Document:
- In the left navigation under CHDO, click Maintain Authorizing Documents. The Authorizing Documents table appears.
- Open the Workspace tab.
- Select the row of the desired document.
HINT: The selected document must meet two criteria before being Issued: 1) it must be authorized in the active A004, and 2) it must have a status of either “FAA Signed,” “Industry Signed,” or “FAA & Industry Signed.”
- Click Issue. A confirmation box appears.
- Click Yes. A pop-up window appears to verify a successful action.
To Reload a Document:
HINT: Clicking Reload while a document is highlighted clears all of the editable data from the template and sets it back to its original state before changes were made. This is similar to deleting a document from the Workspace tab, then moving the same document from the Available tab to the Workspace tab again. Additionally, the document status is changed from “Draft: In process” to “Draft.”
- In the left navigation under CHDO, click Maintain Authorizing Documents. The Authorizing Documents screen appears.
- Open the Workspace tab.
- Select the row of the desired document.
- Click the Reload button. A pop-up window appears to verify a successful action.
- Click OK.
To Delete a Document:
- In the left navigation under CHDO, click Maintain Authorizing Documents. The Authorizing Documents table appears.
- Open the Workspace tab.
- Select the row of the desired document.
- Click Delete. A pop-up window appears to verify a successful action.
- Click OK. The document has been removed from the workspace.
 ): This icon appears in the “Control” column when a document has an expiration date. By hovering the mouse over this icon, in both Available and Issued, users can see the specific expiration date.
 ): This icon appears in the “Control” column when a document has been decommissioned. This icon is only seen in Issued.